
User Guide
F1-X™ Next-Generation 1-Step Gibson Assembly® Master Mix
F1-X™ Next-Generation 1-Step Gibson Assembly® Master Mix
Over the past two decades, molecular biology has been transformed. DNA sequencing has become faster and more accessible, and the cost of synthetic DNA continues to decline. As these technologies advance, the ability to assemble DNA efficiently, accurately, and at scale must evolve in parallel.
At Racer Biosciences, our mission is to create next-generation tools that accelerate innovation in DNA assembly and preparation. The F1-X™ Next-Generation 1-Step Gibson Assembly® Master Mix embodies that mission, bringing better performance, precision, and capabilities to a trusted workflow.
Over a decade ago, the invention of the Gibson Assembly method revolutionized cloning by enabling seamless, one-step assembly of multiple DNA fragments without the need for restriction enzymes or ligation scars. Since its introduction, the method has been cited in over 40,000 publications worldwide.
Building on the simplicity and legacy of the Gibson Assembly method, F1-X™ offers:
Whether you are building expression vectors, genetic circuits, or entire pathways, F1-X™ delivers robust results and accelerates your innovation. This manual guides you through preparation, assembly, and transformation using F1-X™.
At Racer Bio, we prioritize our customer experience and quality above all else.
For help and product feedback, contact info@racerbio.com
For purchase questions, contact sales@racerbio.com
The F1-X™ Next-Generation 1-Step Gibson Assembly® Master Mix, and components and products thereof, is to be used for internal research purposes for the sole benefit of the purchaser only. They may not be used for any other purpose, including, but not limited to, use in drugs, diagnostics, therapeutics, or in humans. The F1-X™ kit and components and products thereof may not be transferred or sold to third parties, resold, modified for resale, used to manufacture commercial products, or to provide a service of any kind to third parties, including, without limitation, reporting the results of purchaser's activities for a fee or other form of consideration. Except as otherwise agreed in writing by our authorized representative, this product is for internal research use only and not for human, animal, therapeutic, or diagnostic use.
The F1-X™ kit, and components and products thereof, is warranted to perform according to specifications stated on the certificate of analysis. No other warranty is made, whether express or implied, including any warranty of merchantability or fitness for a particular purpose. This warranty limits Racer Biosciences Inc.'s and its licensors' liability to only the price of the kit. Neither Racer Biosciences nor its licensors shall have any responsibility or liability for any special, incidental, indirect, or consequential loss or damage whatsoever.
The material in this manual is for informational purposes only and is subject to change without prior notice at any time. Racer Bio and/or its affiliates assume no responsibility for any errors that may appear in this document.
F1-X™ is a trademark of Racer Biosciences. Gibson Assembly® is a registered trademark of Telesis Bio Inc., used under license. This guide references third-party brands to identify products that are compatible with, or commonly used alongside, the F1-X™ Next-Generation 1-Step Gibson Assembly® Master Mix kit. All such names are the property of their respective owners, and their use herein does not imply endorsement or affiliation.
F1-X™ technology is protected under US patent numbers 7,776,532, 8,435,736, 8,968,999, and additional patents pending.
For research use only. Not for use in diagnostic procedures.
| Kit SKU | Kit Name | Components (Name, SKU) | Volume |
|---|---|---|---|
| F1XGA10R | F1-X™ Next-Generation 1-Step Gibson Assembly® Master Mix – 10 reactions | F1-X™ Master Mix (2×) — F1XMM10R | 1 × 100 µL |
| F1-X™ Positive Control (2×) — F1XCTRL | 1 × 50 µL | ||
| F1XGA50R | F1-X™ Next-Generation 1-Step Gibson Assembly® Master Mix – 50 reactions | F1-X™ Master Mix (2×) — F1XMM50R | 1 × 500 µL |
| F1-X™ Positive Control (2×) — F1XCTRL | 1 × 50 µL | ||
| F1XGA100R | F1-X™ Next-Generation 1-Step Gibson Assembly® Master Mix – 100 reactions | F1-X™ Master Mix (2×) — F1XMM100R | 1 × 1,000 µL |
| F1-X™ Positive Control (2×) — F1XCTRL | 1 × 50 µL | ||
| F1XGA250R | F1-X™ Next-Generation 1-Step Gibson Assembly® Master Mix – 250 reactions | F1-X™ Master Mix (2×) — F1XMM250R | 1 × 2,500 µL |
| F1-X™ Positive Control (2×) — F1XCTRL | 1 × 50 µL |
| Parameter | Range |
|---|---|
| Reaction volume | 20 µL standard (tolerance: 2.5–20 µL) |
| Fragment size | 100 bp – 32 kb per fragment |
| Fragment number | 2–12 fragments per reaction |
| Assembly size | Up to 100 kb total |
| Overlap length | 20–40 bp (for 2–3 fragment assemblies); 40+ bp (4+ fragment assemblies) |
| Reaction conditions | 2–3 fragments: 50°C for 15 minutes; 4–12 fragments: 50°C for 60 minutes |
| Reaction temperature | 50°C standard (tolerance: 50–56°C) |
| Compatibility | Mismatches in overlaps; Crude PCR products (up to 20% v/v) |
| Storage | -20°C |
The Gibson Assembly® method enables seamless, 1-Step joining of multiple DNA fragments without restriction enzymes or ligation scars. F1-X™ builds upon this original chemistry with enhanced speed, fidelity, and flexibility. The method relies on user-defined overlapping ends designed into fragments, allowing homologous overlaps to guide assembly. DNA fragments with homologous overlaps are combined with the Gibson Assembly® Master Mix and incubated at a constant temperature (50–56°C). Within this isothermal environment, three coordinated enzymatic activities work in concert (Figure 1).
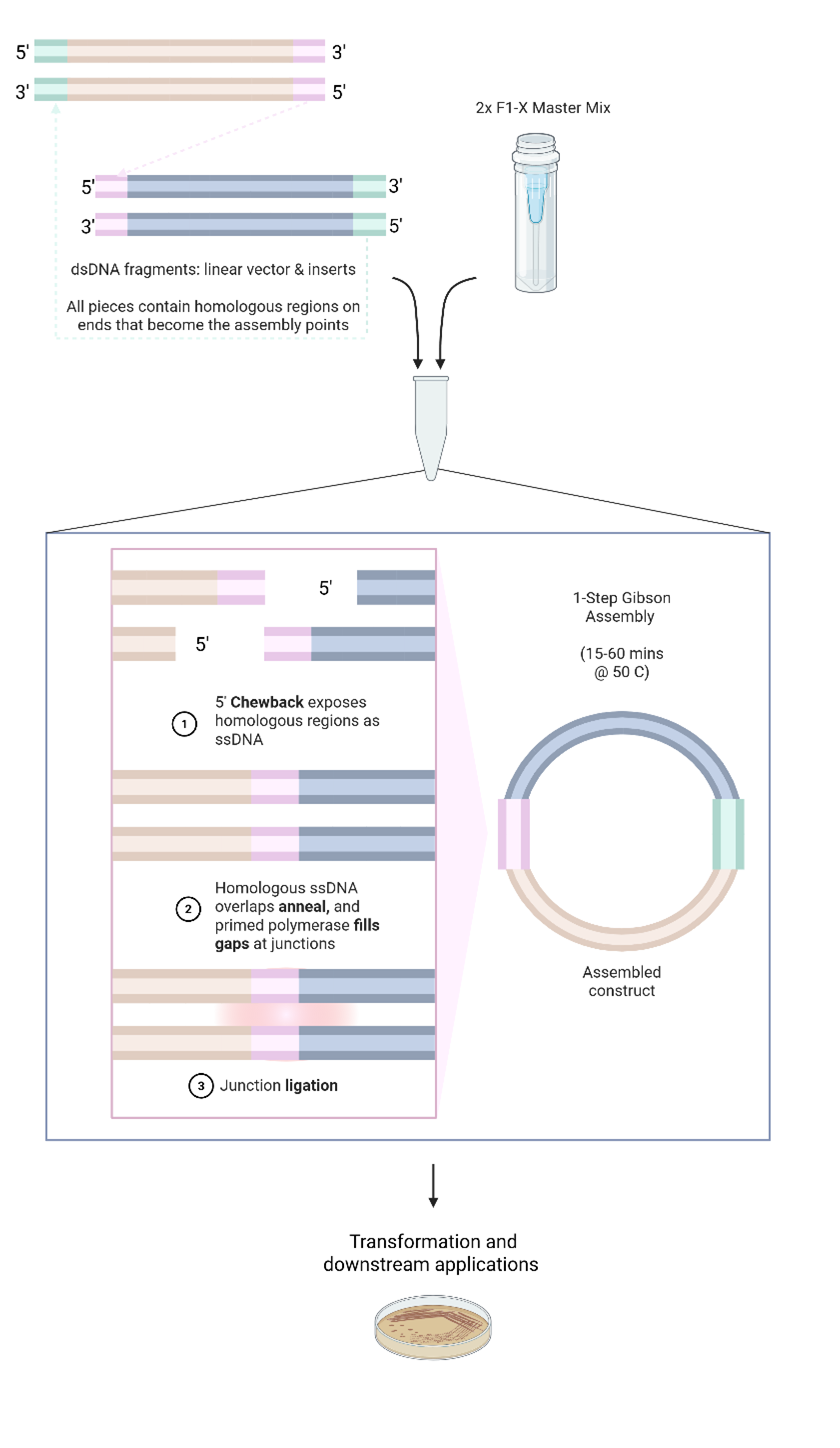
Figure 1. Gibson Assembly Method Overview. Schematic showing the three enzymatic activities (exonuclease, polymerase, and ligase) working together to join DNA fragments with homologous overlaps in a single isothermal reaction. Note that overhang design dictates the circularity or linearity of the final assembly product. Reaction efficiency is influenced by DNA quality, design, concentration, and reaction time/temperature.
The F1-X™ workflow is engineered for simplicity, precision, and speed:
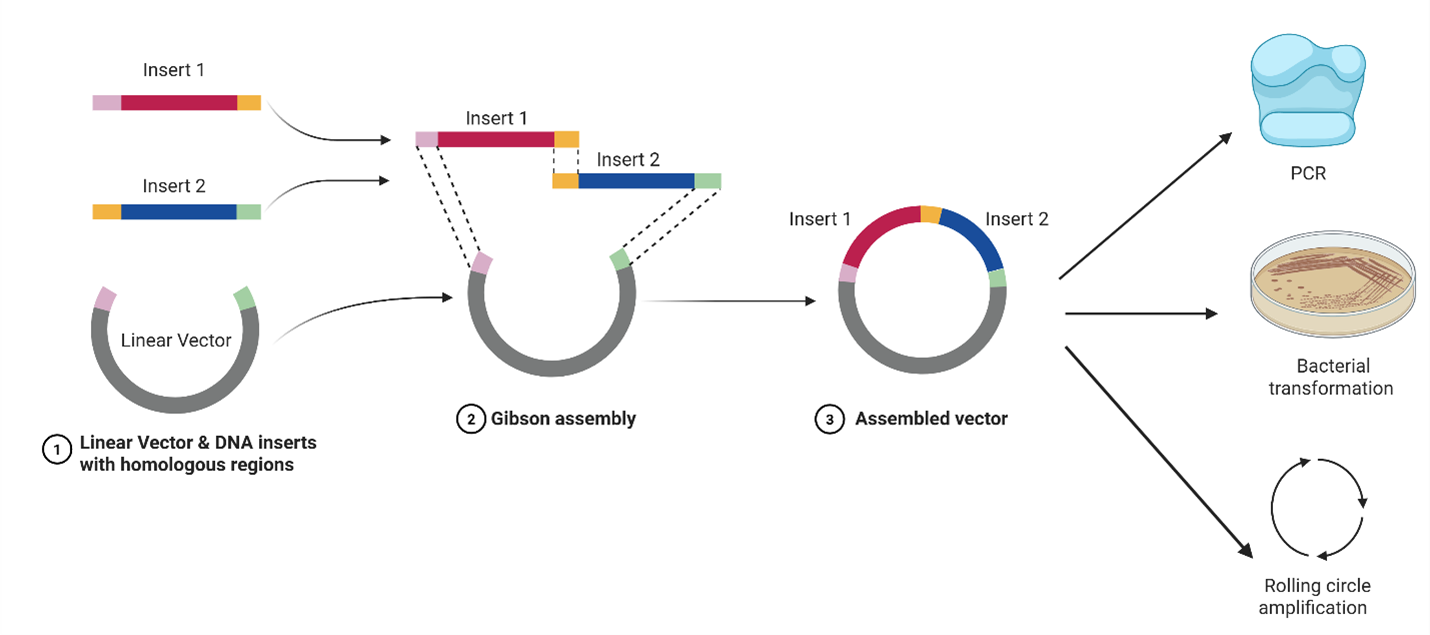
Figure 2. Workflow diagram. DNA fragments with homologous overlaps are assembled in 1 Step using F1-X™ Master Mix (2×). The resulting construct can be directly used downstream.
All DNA fragments require assessment of these three parameters:
| Parameter | Purpose | Example Methods | Acceptance Criteria |
|---|---|---|---|
| Concentration | Accurate quantification for proper stoichiometry | Qubit™, NanoDrop™ | Sufficient for target amounts |
| Integrity | Verify full-length products | Gel electrophoresis, TapeStation™ | >80% full-length product |
| Purity | Assess contamination levels in solution | A260/280, A260/230 ratios | A260/280 ≥1.8, A260/230 ≥2.0 |
| Method | Spectrophotometry (e.g. NanoDrop™) | Fluorometry (e.g. Qubit™) |
|---|---|---|
| Principle | UV absorbance at 260nm | Fluorescent dye specific to dsDNA |
| Speed | < 10 seconds per sample | 2–3 minutes per sample |
| Sample Volume | 1–2 μL | 1–20 μL (assay dependent) |
| Key Strengths | Provides purity ratios (260/280, 260/230); No consumables required; Immediate results; Retains sample | Highly specific for dsDNA; Accurate at low concentrations; Unaffected by RNA/protein; Works with unpurified PCR products |
| Considerations | May overestimate due to contaminants; Less accurate at << 10 ng/μL; Cannot distinguish ssDNA and dsDNA; Not suitable for unpurified PCR | Requires dyes and standards; Consumable costs; Calibration needed; Sample not recoverable |
| Method | Gel Electrophoresis | Capillary electrophoresis (e.g. TapeStation™) |
|---|---|---|
| Output Type | Visual bands on gel | Digital electropherogram |
| Resolution | Qualitative | Quantitative |
| Sample Required | 5–10 μL | 1 μL |
| Key Strengths | Direct visual confirmation; Detects degradation/smearing; Multiple sample comparison; Cost-effective | Automated analysis; Precise sizing; Quantification included; Data automatically in CSV form |
| Considerations | Manual interpretation often needed; Lower resolution for large fragments; More sample consumed | Higher cost per sample; Equipment investment; Kit limitations by size range |
| Ideal Use Case | Routine quality checks | High-throughput or publication data |
| Method | Description | Best Use Case |
|---|---|---|
| Column-Based | Silica membrane columns bind DNA under high-salt conditions | Routine PCR cleanup, general purification |
| Bead-Based | Magnetic beads reversibly bind nucleic acids | High-throughput, automation-compatible workflows |
| Gel Extraction | DNA separated by electrophoresis, target band recovered | Size selection, removal of specific contaminants |
| Precipitation | Alcohol and salts precipitate nucleic acids | Bulk cleanup, concentration of large constructs |
Spectrophotometric Analysis:
PCR is the most versatile method for adding homologous overlaps to an existing piece of DNA. The overall workflow includes:
| Step | Temperature | Time | Cycles | Notes |
|---|---|---|---|---|
| Initial Denaturation | 98°C | 30 sec | 1 | Fully denatures template |
| Denaturation | 98°C | 10 sec | 30 | |
| Annealing | Tm°C* | 10 sec | 30 | Use Tm for gene-specific region only |
| Extension | 72°C | 15–30 sec/kb | 30 | Adjust for amplicon length |
| Final Extension | 72°C | 5 min | 1 | Completes full-length products |
*Calculate based on polymerase vendor's Tm calculator
For vector linearization or fragment excision:
Vectors for assembly can be prepared through multiple approaches, each with specific advantages depending on your source material and throughput requirements. Figure 3 shows a comparison of restriction enzyme digest and PCR options. Optional QC for vector includes transforming linear vector directly to cells to ensure no background colonies are present, and performing a vector-only control to ensure no self-ligation.
| Method | Advantages |
|---|---|
| PCR Amplification | DpnI treatment eliminates template background; Enables overlap addition during amplification; Allows sequence modifications; Compatible with automation |
| Restriction Enzyme Digestion | Cost-effective for high-throughput; Suitable for large vectors (>8 kb); Scalable process; Preserves original vector sequence |
| Synthetic DNA Assembly | Complete sequence control and optimization; No existing plasmid template required; Eliminates PCR artifacts; Vendor normalization saves QC time |
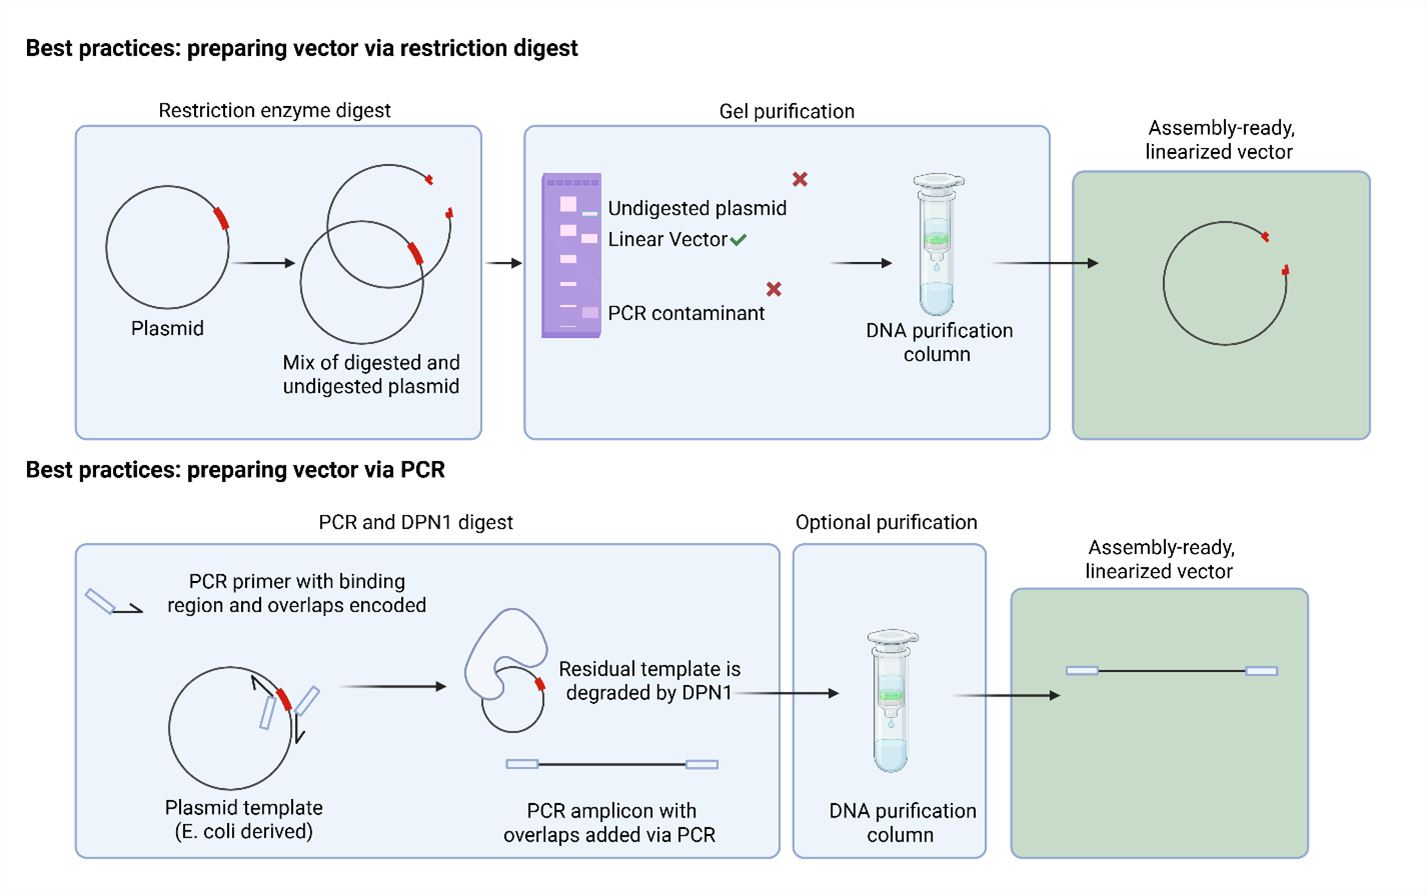
Figure 3. Vector Preparation Workflow Examples. Flowchart showing example workflows for vector preparation from plasmid DNA, including restriction enzyme digest or PCR amplification approaches.
2–3 Fragment Assemblies
| Fragment Size | Recommended Overlap |
|---|---|
| 0.1–2 kb | 20–40 bp |
| 2–10 kb | 30–40 bp |
| 10–32 kb | 40+ bp |
4–12 Fragment Assemblies
| Fragment Size | Recommended Overlap |
|---|---|
| 0.1–5 kb | 40 bp |
| 5–10 kb | 40–60 bp |
| 10–32 kb | 60–80 bp |
Vector-Specific Recommendations
| Vector Size | Overlap Length | Example |
|---|---|---|
| 2–5 kb | 30–40 bp | pUC19, pBR322 |
| 5–8 kb | 40 bp | BAC vector |
| 8–15 kb | 40 bp | Lentiviral vector |
Figure 4 shows a visual depiction of how overlaps for Gibson Assembly work. For complex constructs, consider using the DNA Fragment Splitter for Gibson Assembly tool, which provides automatic fragment splitting with optimized overlaps, synthesis-ready FASTA exports, built-in QC and annotations, and expert-guided feedback in the interface.
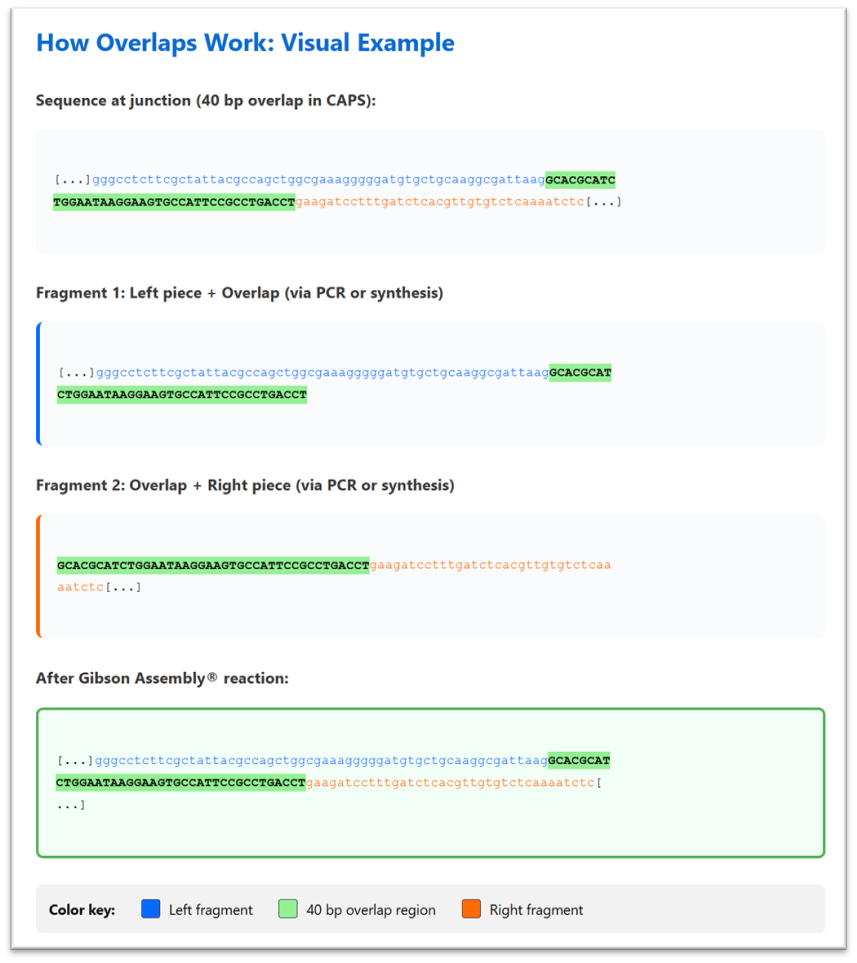
Figure 4. Example of a 40 bp homologous overlap (shown in CAPS) used to join two adjacent DNA fragments. All sequences are shown from 5' to 3'. The F1-X™ Master Mix enzyme blend chews back the 5' ends, allowing the complementary overlap regions to anneal, then extends and ligates to create a seamless junction.
DNA mixtures should be prepared at >2× of the final target concentration. If scaling down, scale DNA amounts linearly with reaction volume.
Target Ratios and Amounts (final amounts in 20 μL reaction):
| Simple Assemblies (2–3 fragments) | Complex Assemblies (4–12 fragments) |
|---|---|
| Total DNA: 0.03–0.2 pmols | Total DNA: 0.2–0.8 pmols |
| Vector amount: 50–100 ng | Per fragment: 0.02–0.1 pmol (0.05 target) |
| Molar ratio*: Vector:Insert = 1:1–1:3, with 1:3 preferred | Molar ratio*: Equimolar (all pieces) |
* For fragments ≤100 bp, use 5× molar excess.
| Size | ng of DNA | pmol of DNA |
|---|---|---|
| 0.5 kb | 20 ng / 40 ng | 0.061 / 0.121 |
| 1 kb | 10 ng / 25 ng | 0.015 / 0.038 |
| 5 kb | 10 ng / 25 ng | 0.003 / 0.008 |
| 8 kb | 25 ng / 50 ng | 0.005 / 0.009 |
| 10 kb | 25 ng / 50 ng | 0.004 / 0.008 |
| 20 kb | 50 ng / 100 ng | 0.004 / 0.008 |
| 30 kb | 50 ng / 100 ng | 0.003 / 0.005 |
To determine the pmols or ngs of DNA:
Materials: F1-X™ Master Mix (2×), F1-X™ Positive Control (2×), DNA fragments, nuclease-free water, thermocycler
Protocol:
| Component | Volume |
|---|---|
| F1-X™ Master Mix (2×) | 10 µL |
| DNA Mix | X µL |
| Nuclease-free water | 10–X µL |
| Total | 20 µL |
For Positive Control: add 10 µL F1-X™ Positive Control (2×) to 10 µL F1-X™ Master Mix (2×) for a 20 µL reaction.
Optimization of dilution factor and amount of cloning reaction to transform is essential for achieving robust colony counts. The suggestions below are guidelines for standard chemically and electrocompetent cell workflows.
| Format | Volume and type of cells | Volume of F1-X™ assembly reaction | Optimization parameters |
|---|---|---|---|
| Microcentrifuge tube | 50 μL chemically competent cells | 2.5–4.0 μL | 3–5 fold dilution in NFW before transformation |
| 96-well plate | 20 μL chemically competent cells | 1.0–2.0 μL | 3–5 fold dilution in NFW before transformation |
| Microcentrifuge tube | 30 μL electrocompetent cells | 2.0 μL of diluted reaction (3-fold dilution) | 3–10 fold dilution in NFW; Column-based desalting |
Guidelines for using DH5α™, NEB® 5-alpha in 96-well plate format are shown below. Always refer to competent cell manufacturer guidelines for more details. If using 50 μL of competent cells in microcentrifuge tubes, transform 2.5 μL of the cloning reaction.
Guidelines for using TransforMax™ EPI300™ or equivalent. Always refer to competent cell manufacturer guidelines for details.
| Transformation Efficiency | Number of Fragments | Suggested Plating Percentage Range*† | Expected Colonies† |
|---|---|---|---|
| > 1×10⁹ CFU/µg pUC19 | 1–5 | 1%–10% | >100 |
| > 1×10⁹ CFU/µg pUC19 | 6–12 | 1%–100%‡ | >100 |
| > 1×10⁸ CFU/µg pUC19 | 1–5 | 10%–100%‡ | >100 |
| > 1×10⁸ CFU/µg pUC19 | 6–12 | 10%–100%‡ | >100 |
*Conservative estimates where percentage refers to % of culture rescue. †Colony counts are estimates and will vary based on assembly complexity, efficiency, DNA quality, and design. ‡Centrifuge briefly and remove supernatant before streaking the pellet.
Since the goal of transformation in cloning is typically to obtain individual colonies for sequencing, plating serial dilutions of transformation culture helps determine optimal plating volumes before sequencing while conserving reagents.
Colonies can be pre-screened for full length assembly product via colony PCR, miniprep/digest, or screened directly from the agar plate depending on the desired workflow.
| Assembly Complexity | Colonies to Screen |
|---|---|
| Simple (2–3 fragments) | 2–8 colonies |
| Complex (4–12 fragments) | 5–10 colonies |
Note: Requirements are sequence dependent. Factors include fragment sizes, fragment error rates, GC content, DNA quality, overlap length, and presence of toxic sequences. Pre-screening colonies with colony PCR or miniprep and restriction digest is recommended for complex assemblies.
The F1-X™ Positive Control (2×) can be used to verify proper assembly conditions and transformation efficiency.
The F1-X™ Positive Control (2×) contains a 4-fragment assembly designed to produce a functional GFP expression cassette in a pUC vector. The mixture includes three insert fragments of ~0.7 kb and one linearized pUC vector fragment (2.8 kb), present at approximately equimolar ratios (1:1:1:1). All fragments contain 40 bp homology regions for seamless assembly. Upon successful assembly, the fragments combine to form an approximately 4.7 kb circular plasmid containing an intact GFP gene under constitutive expression.
1. Assembly Reaction Setup — Prepare a 20 µL reaction as follows:
| Component | Volume |
|---|---|
| F1-X™ Positive Control (2×) | 10 µL |
| F1-X™ Master Mix (2×) | 10 µL |
| Total Volume | 20 µL |
2. Mix gently and incubate at 50°C for 15–60 minutes. Note that the positive control contains 4 fragments. While this is technically within guidance for a 60 minute reaction time, this particular assembly has been verified down to 15 minutes for ease of use alongside simple assemblies.
3. Transform according to guidelines above alongside experimental samples.
Note: If fluorescence is difficult to visualize under room light, illuminate plates with blue light or use colony count as the primary success metric.
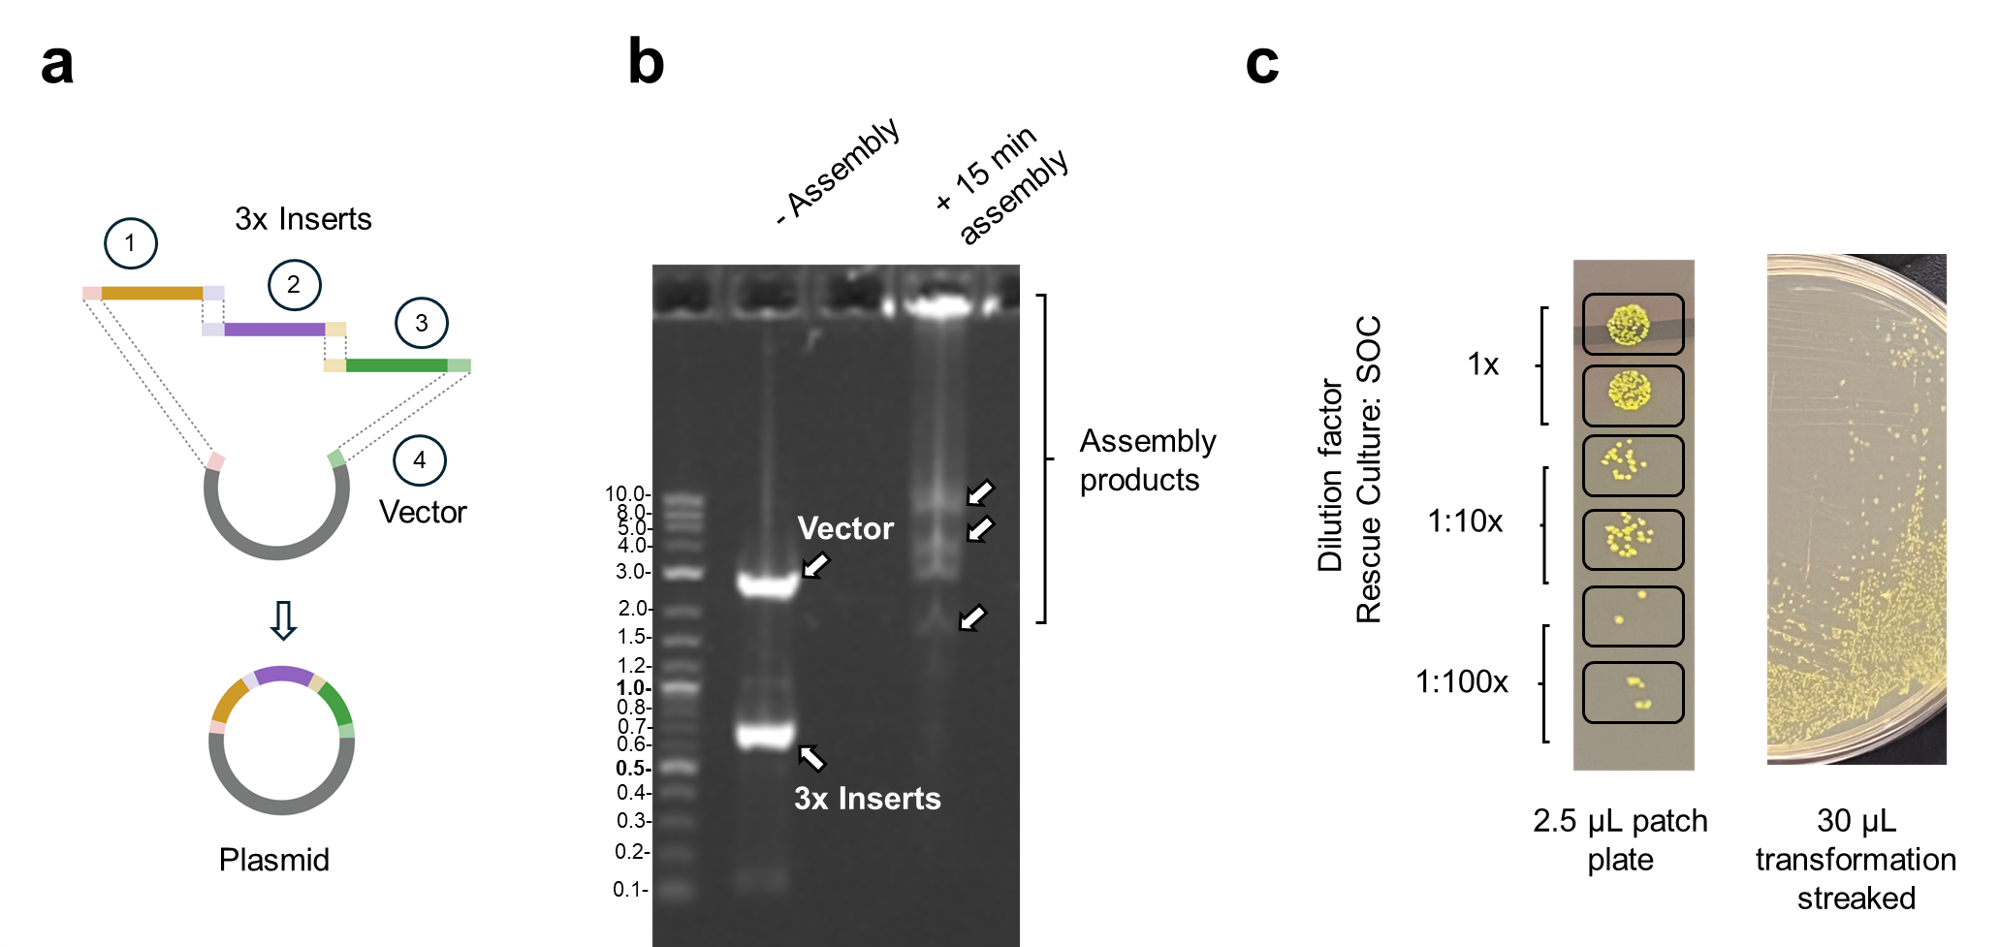
Figure 5. (a) Schematic of the 4-fragment assembly. Three insert fragments (1, 2, 3) and one linearized vector fragment (4) are assembled into a circular plasmid containing an intact GFP gene. (b) Agarose gel electrophoresis showing assembly products. Without Master Mix (left lane), distinct bands are visible for the vector (2.8 kb) and three insert fragments (~0.7 kb each). With Master Mix assembly at 50°C for 15 minutes (right lane), high molecular weight products are observed. (c) Transformation results showing green fluorescent colonies.
Gibson Assembly chemistry can eliminate restriction enzyme seams during assembly. The 5′ exonuclease activity removes restriction site overhangs, while polymerase and ligase activities create seamless junctions between fragments with homologous overlaps.
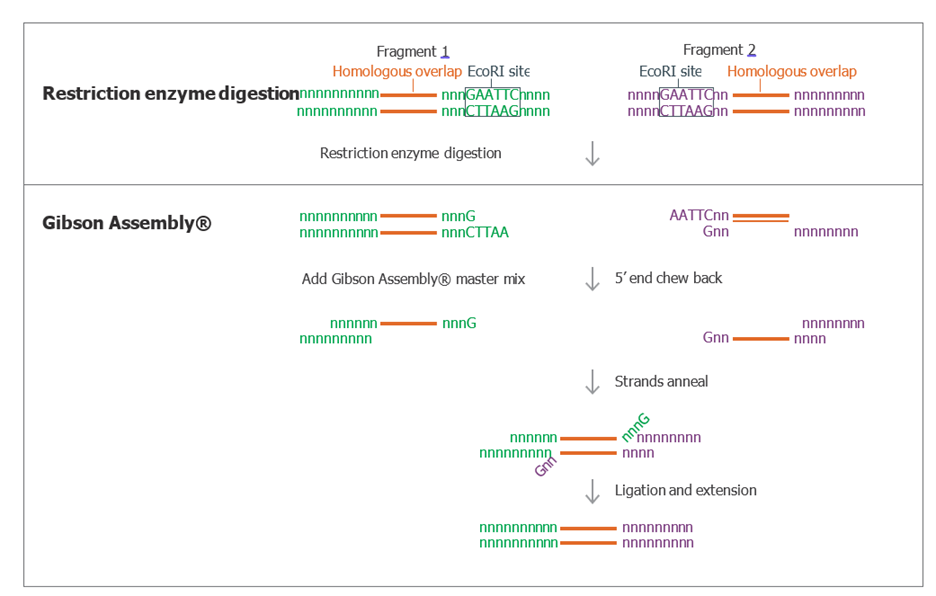
Figure 6. Elimination of EcoRI Seam During Gibson Assembly. Diagram depicting two fragments with homologous overlap regions (shown in orange) and an external EcoRI site. Following restriction enzyme digestion with EcoRI, the fragments may be assembled using the Gibson Assembly reaction. The restriction enzyme digestion seam is eliminated by the 5' chew back and ligation activities of the F1-X™ Master Mix.
| Issue | Likely Cause | Solution |
|---|---|---|
| No colonies from positive control | Competent cell issue | Use high-efficiency cells (≥10⁹ CFU/μg); Handle cells carefully (no vortex, keep cold); Add a plasmid control to transformation |
| Improper Master Mix handling | Reduce freeze-thaw cycles; Thaw on ice; Vortex 15 sec before use | |
| Selection issue | Confirm antibiotic concentration; Check plate freshness | |
| No colonies from experimental samples | Primer design / bad overlaps | Verify overlap length (~40 bp); Check for secondary structures; Confirm primer specificity; Run assembly on gel to confirm change in molecular weight |
| Low assembly efficiency | Column purify PCR products; Check DNA quality (concentration, purity); Verify fragment integrity by gel and gel extract if needed | |
| DNA molar ratios are off | Use Qubit™ for quantification; Check A260/280 ratio (≥1.8); Remove contaminants and repeat | |
| High vector background | Background template from vector prep | Treat with DpnI for PCR vectors; Gel purify to remove uncut plasmid; Consider CIP treatment; Transform vector directly to cells (no assembly) to gauge background |
| Self ligation of vector | Use double digest for restriction vectors; Increase overlap length (>20 bp, target 40 bp) | |
| Incorrect assemblies | Input DNA errors | If suspected, sequence fragments before assembly; Use high-fidelity polymerase and constrain PCR cycles |
| Assembly conditions | Increase overlap length (40+ bp); Raise reaction temperature to 55°C; Extend incubation time; Ensure molar ratios are correct | |
| Recombination in bacterial host | Run a no-Master Mix control; If unwanted recombination is an issue, split assembly into 3+ DNA pieces or reduce overlap length to <25 bp | |
| Low colony numbers | Transformation efficiency | Use fresh, high-efficiency cells; Optimize dilution factor; Column purify assembly reaction to desalt; Try electroporation |
| Insert toxicity | Use low-copy vector; Reduce incubation temperature (30°C); Try different E. coli strains | |
| Inconsistent results | Reaction setup | Ensure reactions are set up on ice; Ensure thermal cycler has reached temperature; Avoid pipetting ultra-small volumes |
| Equipment calibration | Verify thermal cycler temperature or run a temperature gradient |
| Issue | Likely Cause | Solution |
|---|---|---|
| Multiple PCR bands | Non-specific amplification | Optimize annealing temperature; Redesign primers; Use touchdown PCR |
| Low PCR yield | Poor primer design | Check for secondary structures; Optimize Mg²⁺ concentration; Increase primer concentration |
| Gel smearing | DNA degradation | Use fresh reagents; Check for nuclease contamination; Keep samples cold; Purify samples before storage in TE buffer |
| Low A260/230 ratio | Organic contamination | Re-purify with cleanup kit; Use ethanol precipitation; Check buffer carryover |
What are the advantages of Gibson Assembly®?
1-Step, seamless cloning without restriction site dependence; scarless junctions with no unwanted sequences; versatile for genes, plasmids, pathways, and whole genomes; direct use for transformation, PCR, or rolling circle amplification.
Can I amplify the assembled product directly?
Yes. The covalently joined DNA can be used as a PCR template or for rolling circle amplification without purification. As a starting point, we recommend testing 1 µL of F1-X™ reaction in a 20 µL PCR or rolling circle amplification reaction following manufacturer guidelines.
Can I combine ssDNA oligonucleotides with dsDNA fragments?
Yes. Use 45 nM as starting concentration for each oligonucleotide. Oligonucleotides >90 bases may have interfering secondary structures.
Can I assemble linear fragments without a vector?
Yes. F1-X™ can assemble multiple linear fragments into complete plasmids, including entire constructs from synthetic DNA. Note that the orientation of overlap design dictates the final construct sequence.
How large can assembled fragments be?
For individual fragments: up to 32 kb. For total construct size: up to 100 kb. Larger constructs are possible with multi-stage assembly.
How many fragments can I assemble?
Up to 12 fragments is recommended for single-stage assembly, and we have verified up to 14 fragments in a single reaction. It is critical that overlaps are 40 bp or more for multi-fragment assemblies. More fragments may be possible with multi-stage approaches.
Will this work with repetitive sequences?
Yes. Design fragments with repetitive sequences internalized rather than at overlap regions, or use longer overlaps for uniqueness.
Can small fragments (≤200 bp) be assembled?
Yes. F1-X™ handles fragments as small as 100 bp. Use ≥5-fold molar excess for optimal results.
Do I need to use PCR for vector preparation?
No. Vectors can be linearized by restriction digest. All end types (blunt, 5′ overhang, 3′ overhang) are compatible. Vectors can also be prepared synthetically as gene blocks or fragments.
What are the shortest/longest overlaps I can use?
We recommend 40 bp as a starting point for all assemblies. For simple assemblies of 2–3 fragments, as little as 20 bp overlaps can work. For complex constructs of 4+ fragments, use 40+ bp.
How should I store the kit?
Store at -20°C in a stable temperature location (not a frost-free freezer). Limit to 5 freeze-thaw cycles or aliquot for frequent use.
What DNA concentrations should I use?
Use the amounts specified in the protocol section. Lower concentrations can be tested if materials are limiting.
Can I use different incubation times?
Use a minimum 15 minutes for simple assemblies; for more complex assemblies, we recommend starting with a 1 hour assembly time, then optimizing for shorter reaction times down to 15 minutes as allowed. We have seen success with multi-fragment assemblies (including the 4-fragment positive control and a 9-fragment control) down to 15-minute reaction times, but 60 minutes is a conservative place to start.
Can I use different incubation temperatures?
We recommend 50°C as a starting point for all assembly reactions. F1-X™ contains a proprietary blend of high-fidelity enzymes that are active between 50°C–56°C. If your construct requires additional optimization for enhanced annealing stringency, run the assembly at 53°C–56°C and extend the reaction time between 1–2 hours.
Do I need to inactivate restriction enzymes used to prep my DNA?
Yes. Residual restriction enzyme can cause star activity and DNA degradation.
Is gel purification necessary?
It is not required if PCR yields >80% full-length product. Low molecular weight contaminants caused by off-target amplification in PCR have a detrimental effect on cloning efficiency.
What sequencing protocol is recommended?
Sequence entire insert plus ~500 bp of vector at junctions. If PCR was used for vector preparation, consider sequencing entire construct using NGS or Sanger sequencing. We recommend consulting with your sequencing vendor to find the right workflow for your needs.
I don't see full-length product when I visualize assemblies via agarose gel electrophoresis. Is something wrong?
No, this is normal. Agarose gel electrophoresis is a qualitative, construct-dependent indicator of assembly success. Gibson Assembly reactions often produce high molecular weight species that appear as laddering rather than discrete bands. Compare your assembly reaction to a no-assembly control and look for reduced substrate bands and higher molecular weight products. For definitive confirmation, use transformation as your primary success metric — colony count and sequencing verification provide definitive confirmation of assembly success.